In 2019, I published this pattern using the name Evelina Del Bosque on Ravelry. Now I improved the pattern and republished it. Hope you like the new version!
If you want an ad-free PDF version you can get the pattern through my Ravelry store:
https://www.ravelry.com/patterns/library/docker-whale-amigurumi.
If you just want to support me, you can Buy Me a Tea
This is a pattern by LinZi. Feel free to contact me via
Ravelry (https://www.ravelry.com/people/SoftiesFromLinzi),
Instagram (https://www.instagram.com/softiesfromlinzi) or
Blogger (https://www.softieslinzi.art/).
Please send me messages or tag me if you have any problem following the pattern, notice a mistake, or just show me your creation.
Please do not redistribute this pattern, link to my Ravelry, Instagram or Blogger account instead. Make as many as you like for yourself or your friends, but please do not sell them. Thank you!
Materials
Yarns:
- Blue: body and containers
- White: eyes and mouth
- Black: eyes and mouth
Yarn weight is not very important, but please choose the hook accordingly.
I used Catona cotton from Scheepjes (which is 50 grams - 125 m) with a 2.5 mm hook. The end product is around 11*8*6 cm big.
Please note that by using thicker yarn and a bigger crochet hook, your end product will be bigger than mine. You can also create a smaller product by using thinner yarn and a smaller crochet hook.
For stuffing:
You can use the polyfill or any other type of filling you like.
Others:
You can cut cardboard to corresponding shapes, and then glue them to the inside of top body part and container parts. This can help the amigurumi to hold its shape better.
Abbreviations
Rnd = round
ch = chain
st = stitch
sl = slip stitch
sc = single crochet
dec = decrease by sc 2 together
inc = increase by sc 2 in one st
hdc = half double crochet
dc = double crochet
‘...” = the part you need to repeat
BLO = back loop only
Pattern
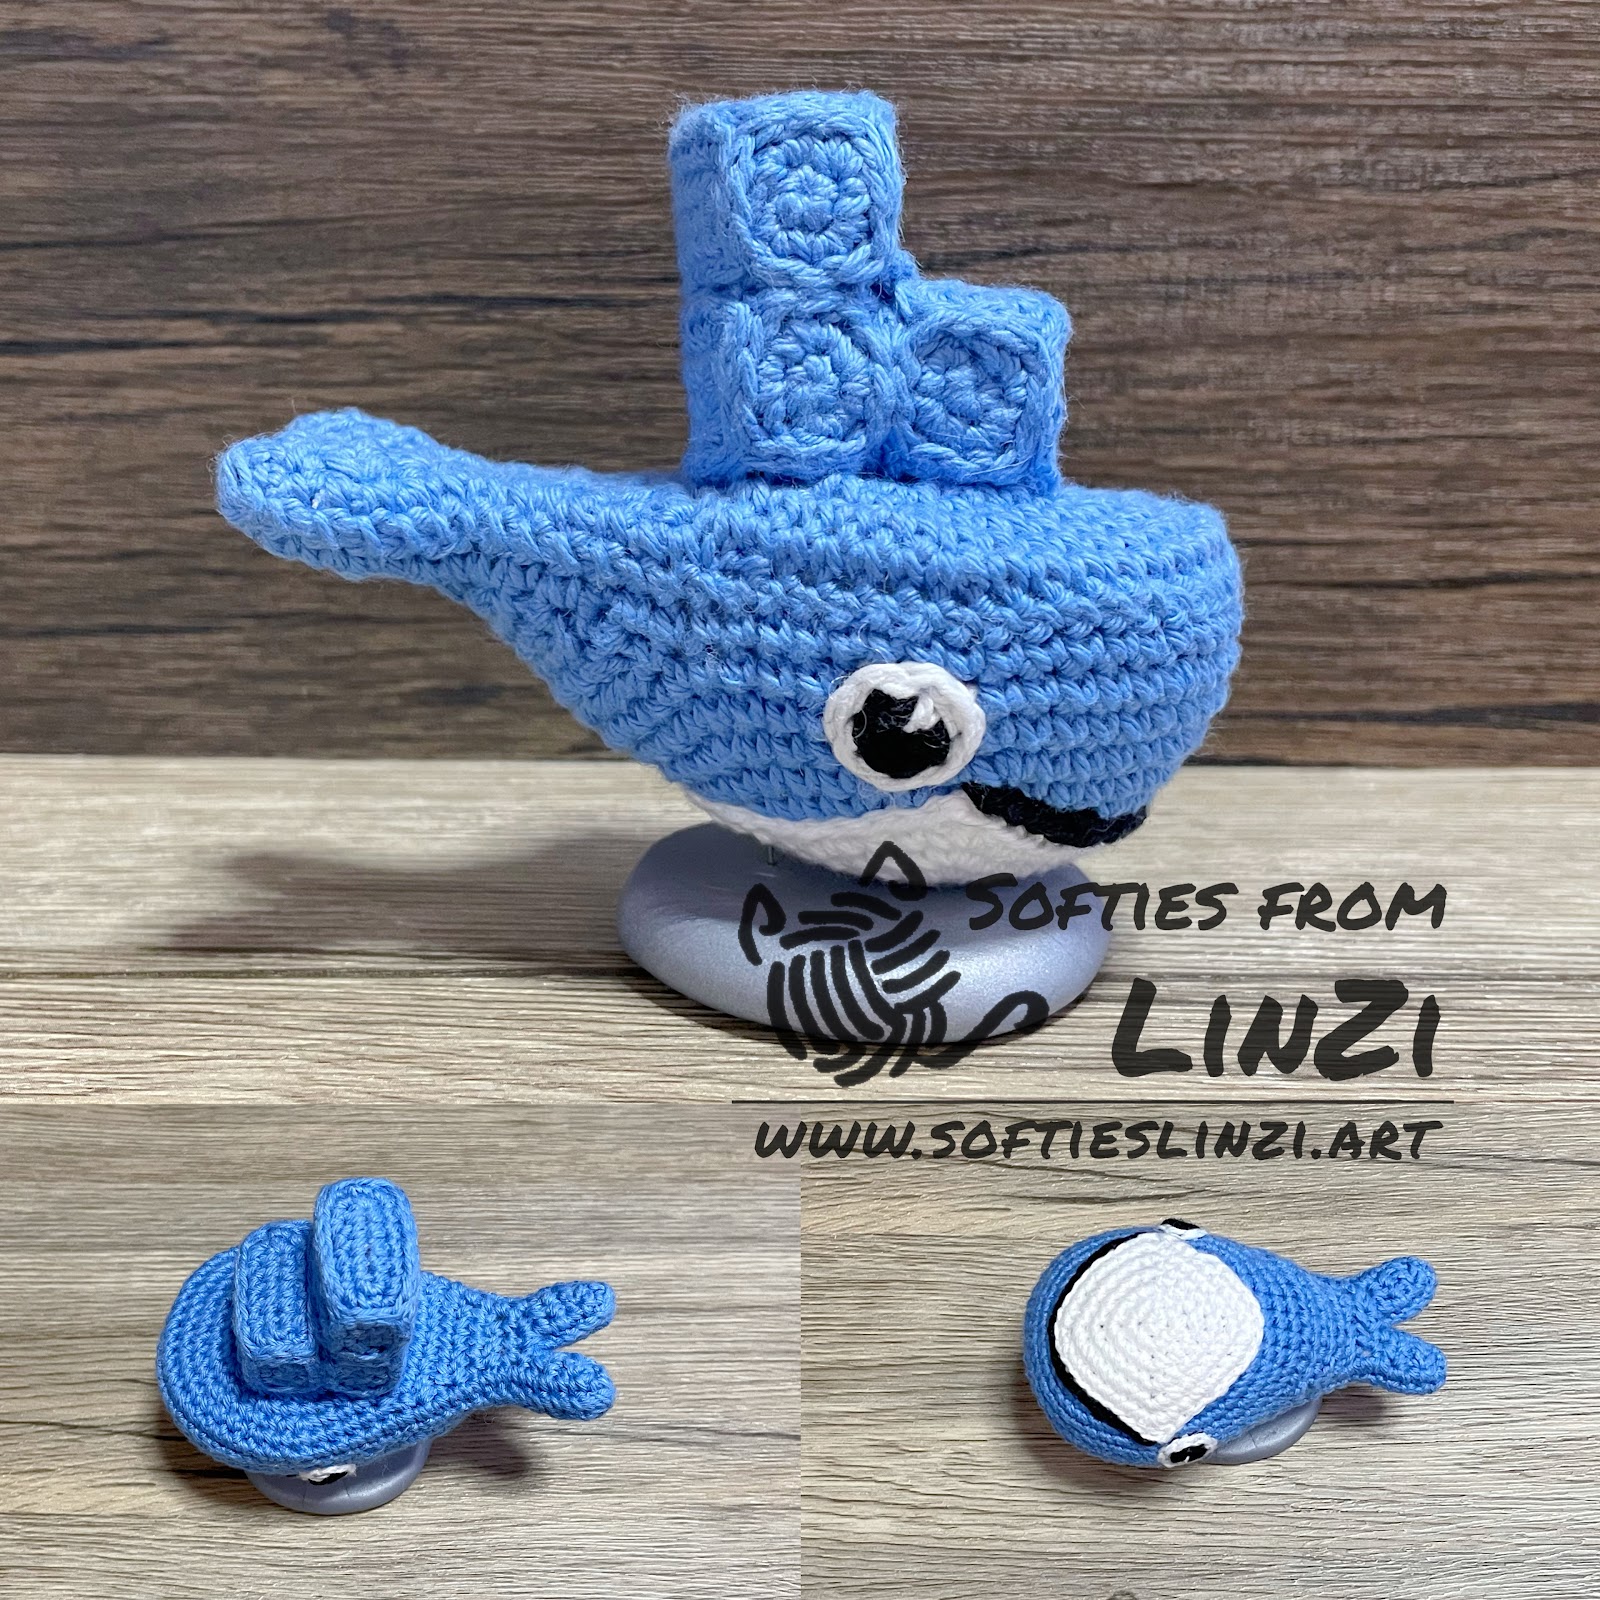
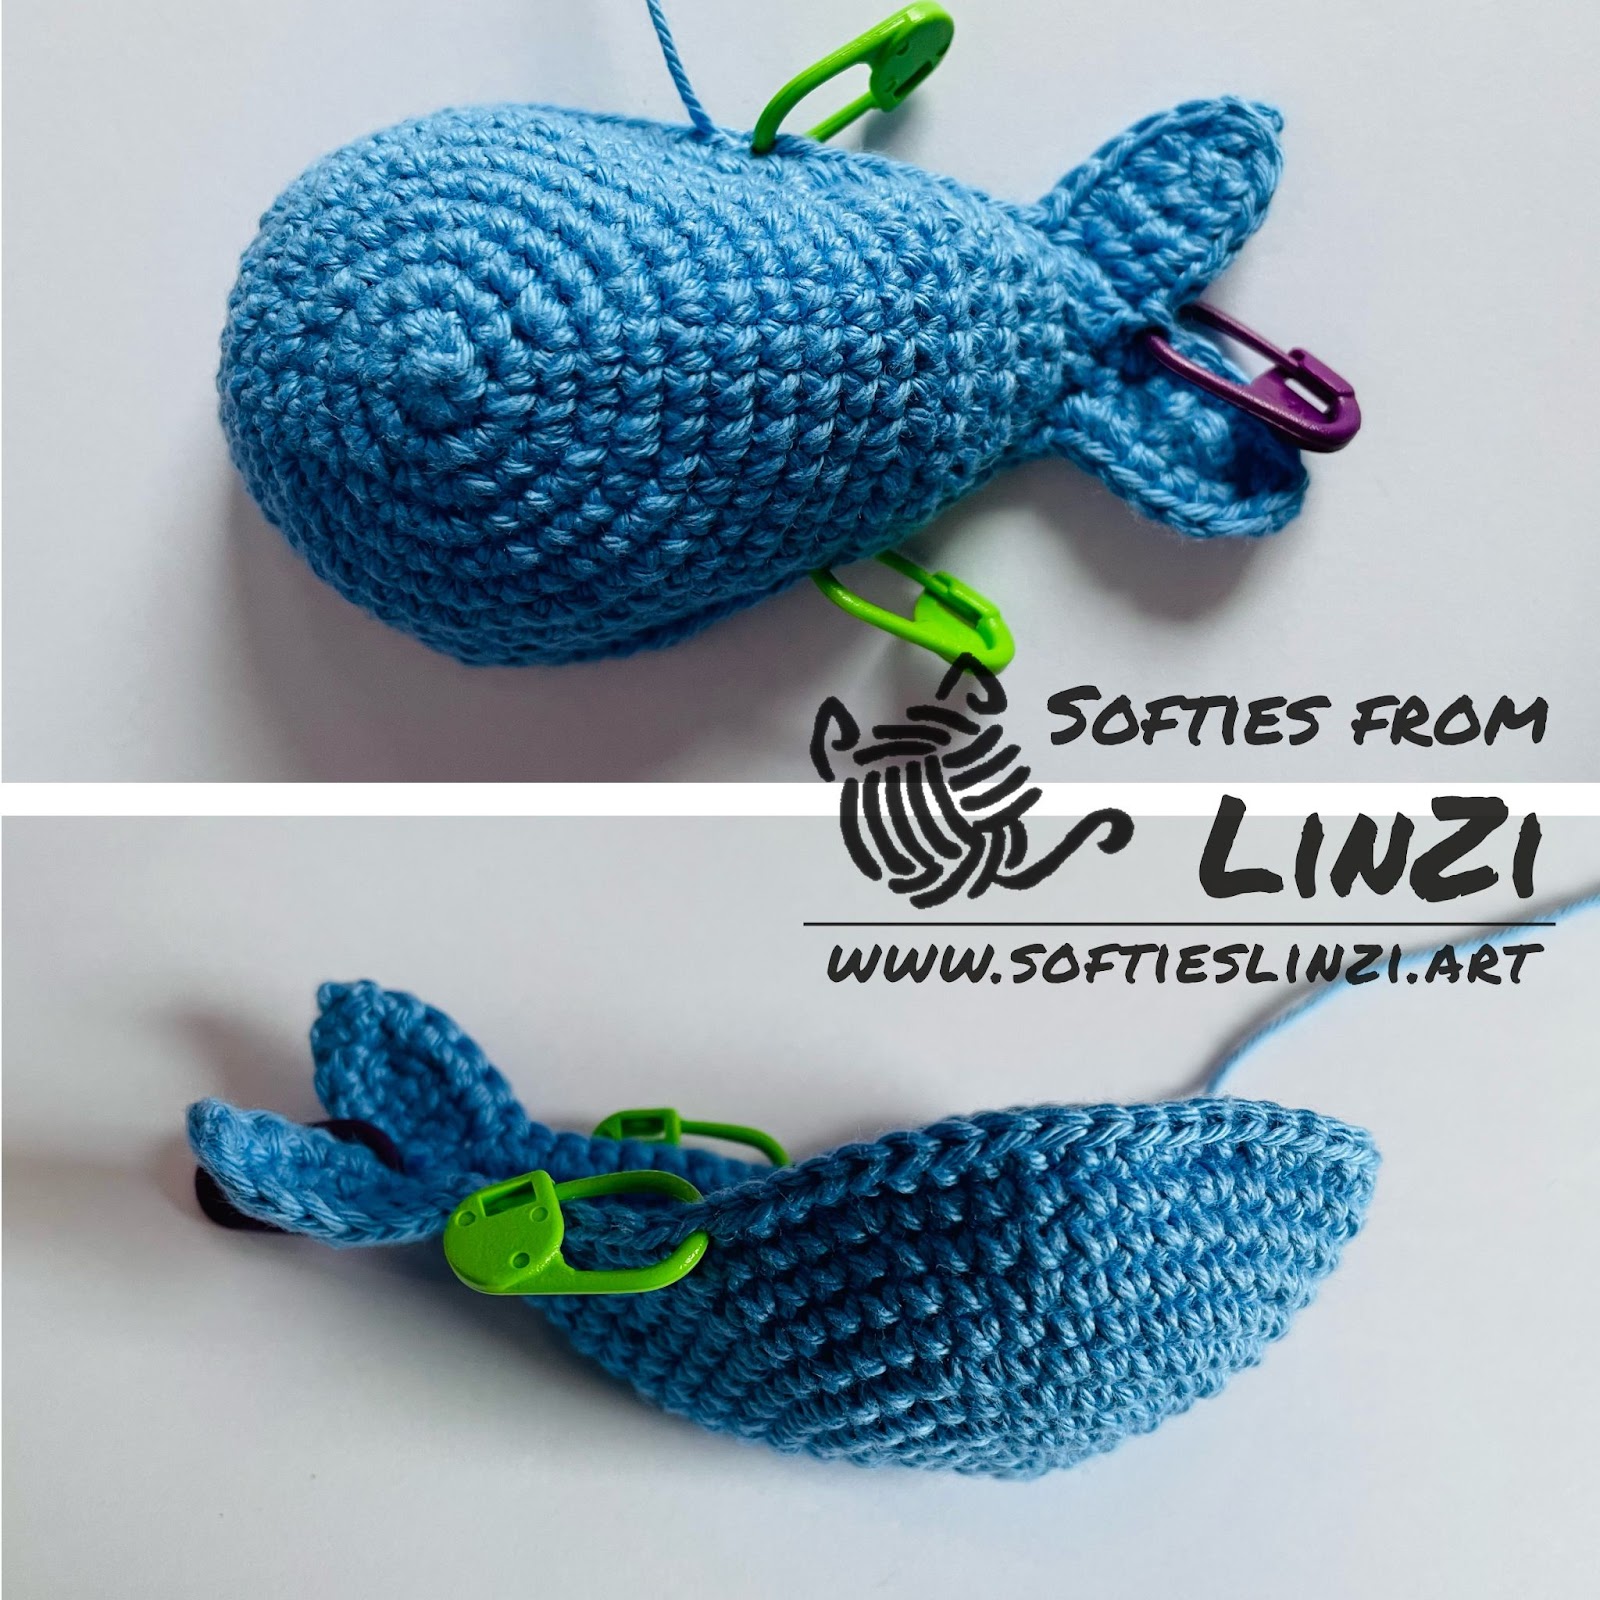
Body
With blue yarn, make the top and bottom parts separately, and then sew them togerher
Top part
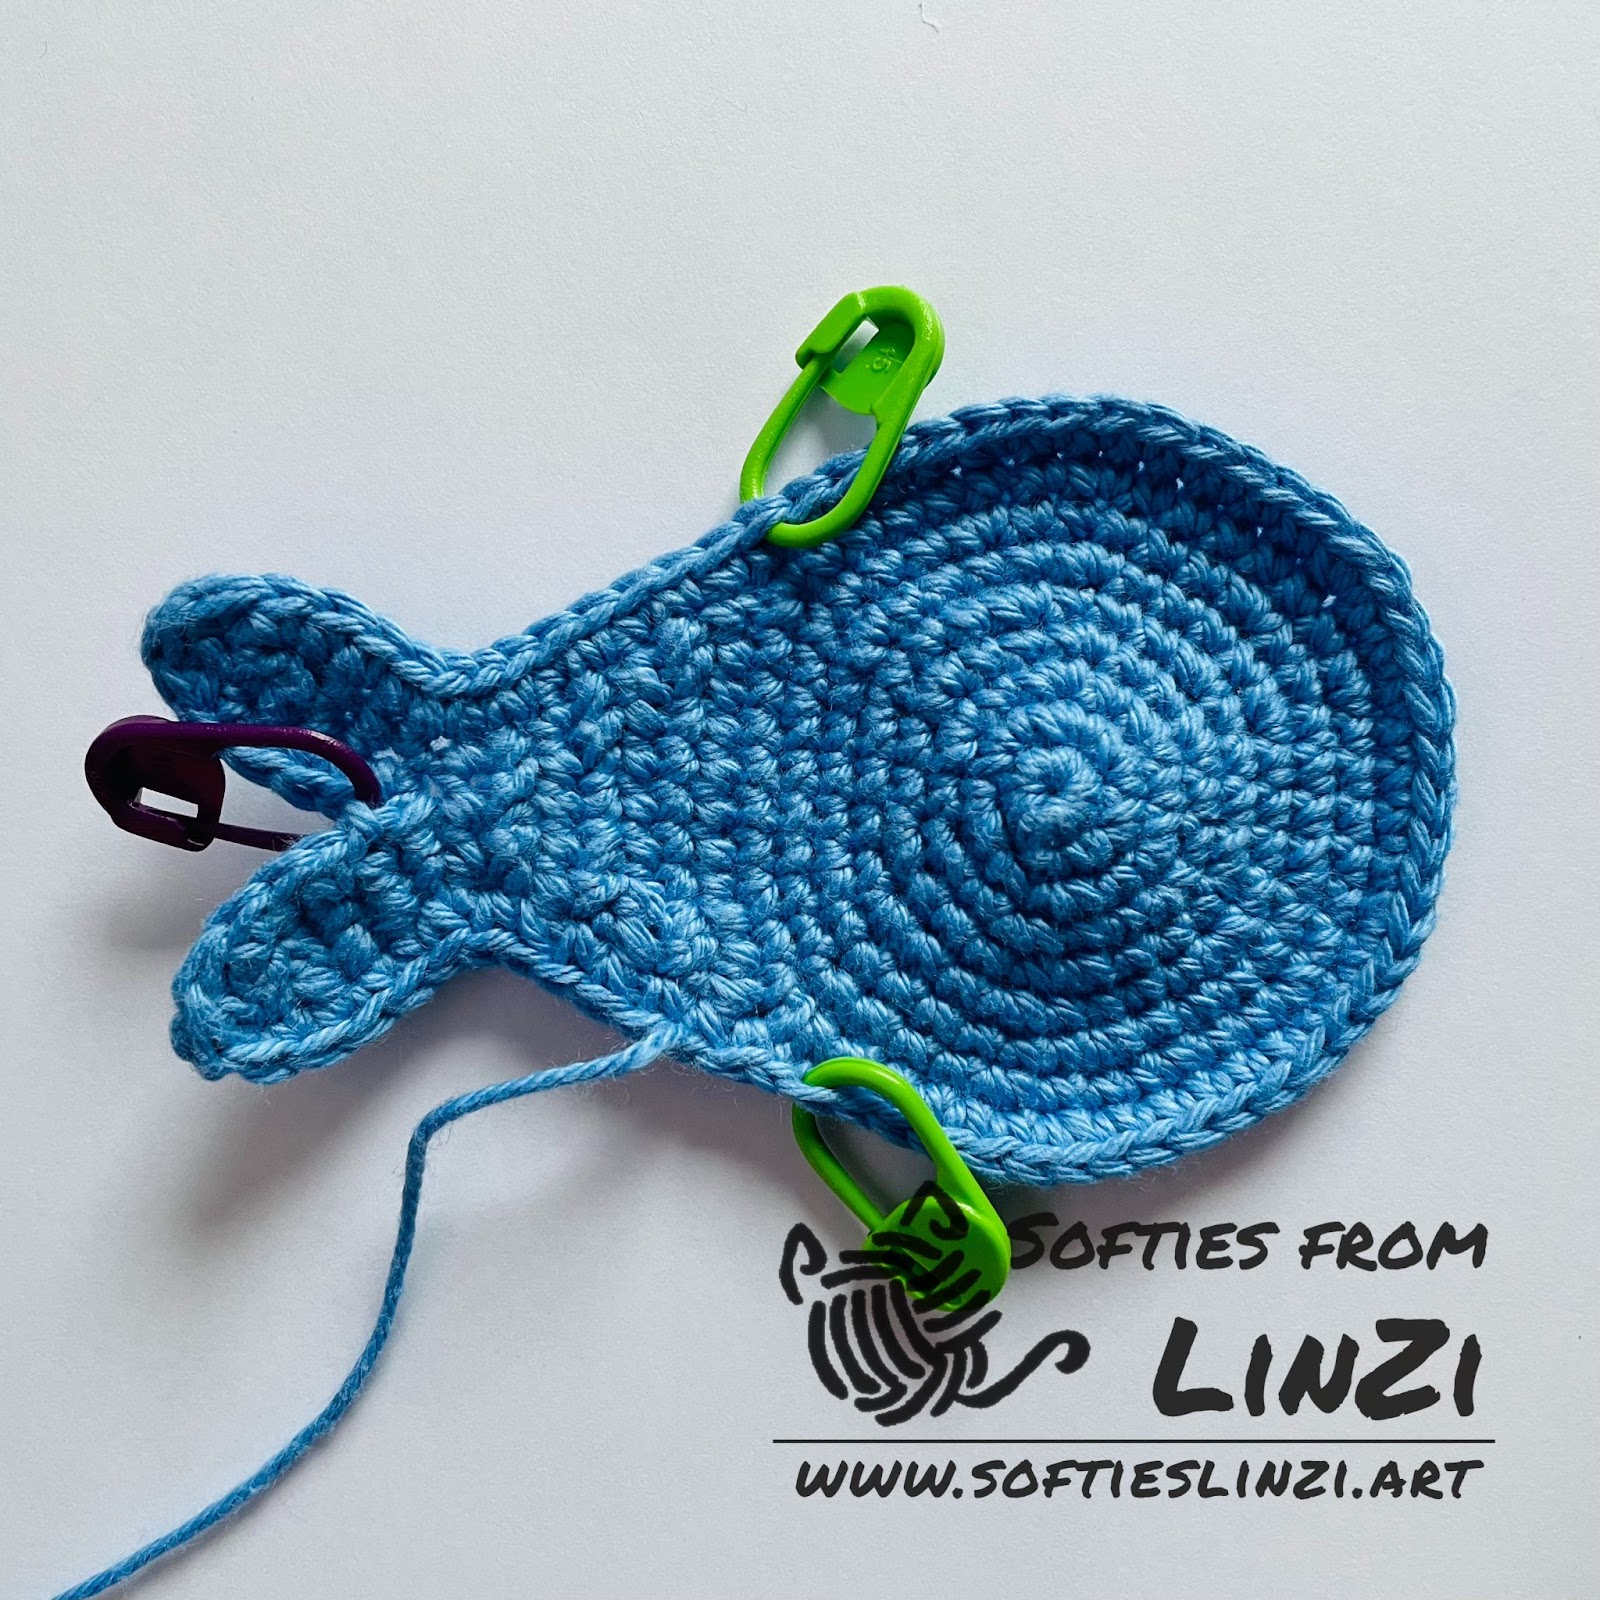
Rnd 01: start with 6sc in magic ring (6)
Rnd 02: 6inc (12)
Rnd 03: ‘sc, inc’, repeat * 6 (18)
Rnd 04: ‘sc, inc, sc’, repeat * 6 (24)
Rnd 05: ‘3sc, inc’, repeat * 6 (30)
Rnd 06: ‘2sc, inc, 2sc’, repeat * 6 (36)
Rnd 07: ‘5sc, inc’, repeat * 6 (42)
Rnd 08: ‘3sc, inc, 3sc’, repeat * 6 (48)
start to make the tail part
Rnd 09: ch1 and turn, 12sc (12)
Rnd 10: ch1 and turn, sc, dec, 6sc, dec, sc (10)
Rnd 11: ch1 and turn, sc, dec, 4sc, dec, sc (8)
Rnd 12: ch1 and turn, sc, dec, 2sc, dec, sc (6)
Rnd 13: ch1 and turn, 6sc (6)
Rnd 14: ch1 and turn, sc, dec, dec, sc (4)
Rnd 15: ch1 and turn, 4sc (4)
start to make the flukes
Rnd 16: ch1 and turn, 2sc (2)
Rnd 17: ch1 and turn, inc, sc (3)
Rnd 18: ch1 and turn, sc, inc, sc (4)
Rnd 19: ch1 and turn, sc, dec, sc (3)
Rnd 20: ch1 and turn, dec, sc (2)
Rnd 21: ch1 and turn, dec (1)
restart from the 3rd st on Rnd 15, repeat Rnd 16-21 to create another fluke
restart from the start of the tail (the st beside the ch1 and turn of Rnd 09) on Rnd 08:
5sc, inc; ‘7sc, inc’, repeat * 3; 6sc (on the head area)
continue sc around the tail, after 19sc you should reach the median notch, dec and then continue do 19sc
you will have 40 + 19 + 1 + 19 = 79 st in total, then fasten off and leave a long tail for sewing
Bottom part
Rnd 01: start with 6sc in magic ring (6)
Rnd 02: 6inc (12)
Rnd 03: ‘sc, inc’, repeat * 6 (18)
Rnd 04: ‘sc, inc, sc’, repeat * 6 (24)
Rnd 05: ‘3sc, inc’, repeat * 6 (30)
Rnd 06: ‘2sc, inc, 2sc’, repeat * 6 (36)
Rnd 07: ‘5sc, inc’, repeat * 6 (42)
Rnd 08-09: 42sc (42)
Rnd 10: ‘3sc, inc, 3sc’, repeat * 6 (48)
Rnd 11: 48sc (48)
Rnd 12: ‘75sc, inc’, repeat * 6 (54)
start to make the tail part
Rnd 13: ch1 and turn, 14sc (14)
Rnd 14: ch1 and turn, sc, dec, 8sc, dec, sc (12)
Rnd 15: ch1 and turn, sc, dec, 6sc, dec, sc (10)
Rnd 16: ch1 and turn, sc, dec, 4sc, dec, sc (8)
Rnd 17: ch1 ch1 and turn, 8sc (8)
Rnd 18: ch1 and turn, sc, dec, 2sc, dec, sc (6)
Rnd 19: ch1 and turn, sc, dec, dec, sc (4)
start to make the flukes
Rnd 20: ch1 and turn, 2sc (2)
Rnd 21: ch1 and turn, inc, sc (3)
Rnd 22: ch1 and turn, sc, inc, sc (4)
Rnd 23: ch1 and turn, sc, dec, sc (3)
Rnd 24: ch1 and turn, dec, sc (2)
Rnd 25: ch1 and turn, dec (1)
restart from the 3rd st on Rnd 19, repeat Rnd 20-25 to create another fluke
restart from the start of the tail (the st beside the ch1 and turn of Rnd 12) on Rnd 13:
40 sc around the head area;
continue sc around the tail, after 19sc you should reach the median notch, dec and then continue do 19sc
you will have 40 + 19 + 1 + 19 = 79 st in total, then fasten off and leave a long tail for sewing
Mouth
Start with white yarn
Rnd 01: 4sc in magic ring (6)
Rnd 02: ‘3sc in one st’, repeat * 4 (12)
Rnd 03: ‘sc, 3sc in one st, sc’, repeat * 4 (20)
Rnd 04: ‘2sc, 3sc in one st, 2sc’, repeat * 4 (28)
Rnd 05: ‘3sc, 3sc in one st, 3sc’, repeat * 4 (36)
Rnd 06: 4sc, hdc & dc & hdc in one st, 17sc, hdc & dc & hdc in one st, 13sc (44)
then fasten off and leave a long tail for sewing
With black yarn
BLO 19sl on the top edge of the mouth (between these 2 dc st)
Eyes
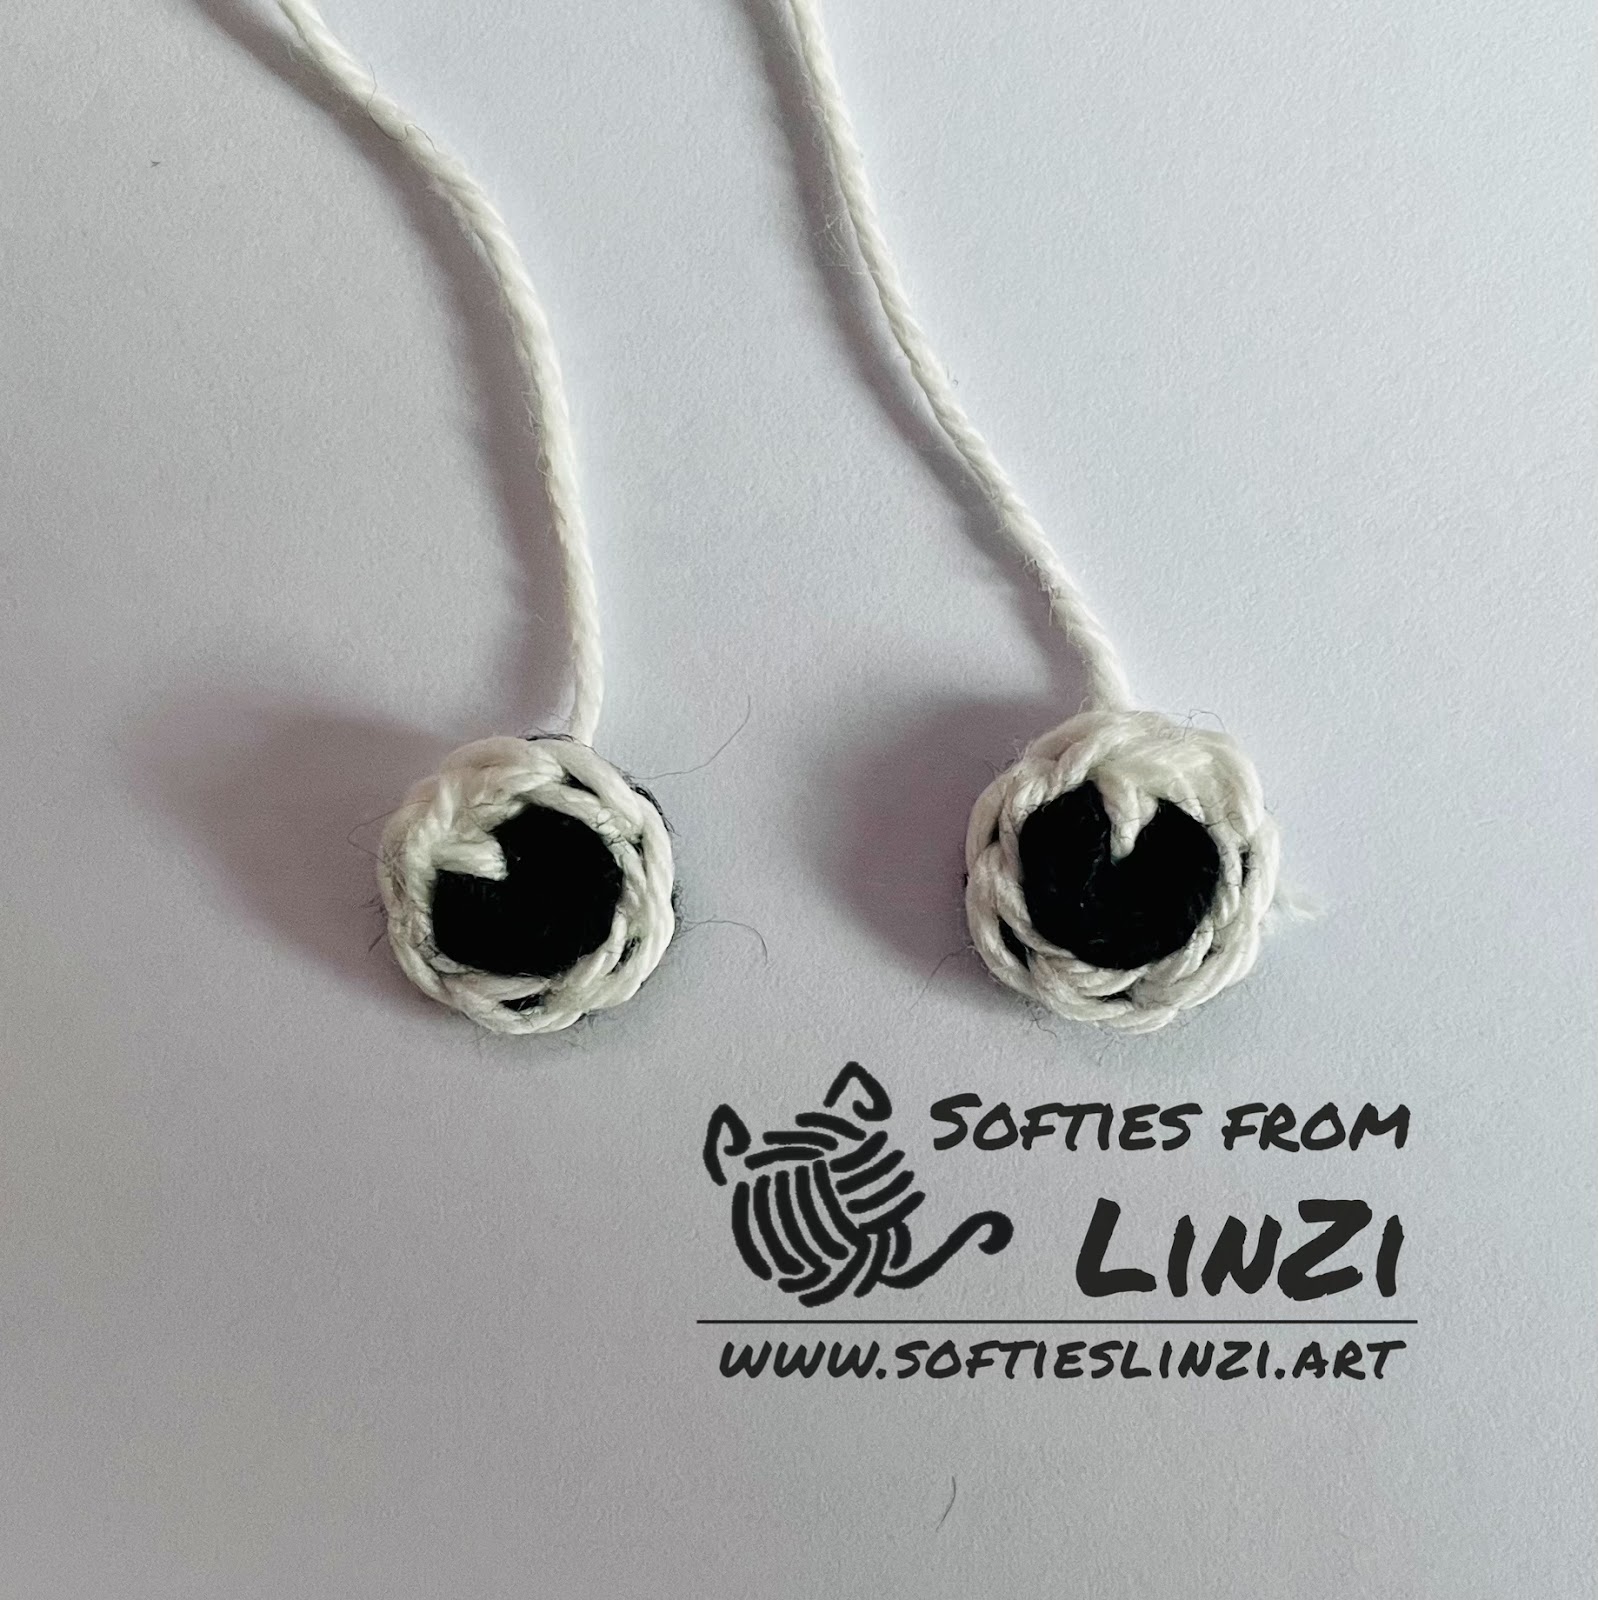
Start with black yarn, make two
Rnd 01: start with 7sc in magic ring (7)
Change to white yarn
Rnd 02: BLO 7sl (7)
then fasten off and leave a long tail for sewing
also use the white yarn to create the highlight of the eyes
Containers

With blue yarn make three containers in total
For each container, make 2 square parts and 4 rectangle parts, and then sew them together
Square part
3st * 3st
Rnd 01: 4sc in magic ring (6)
Rnd 02: ‘3sc in one st’, repeat * 4 (12)
then fasten off and leave a long tail for sewing
Rectangle part
3st * 8st
ch7, turn and start from the second st
Rnd 01: 5sc, inc; turn to the other side of the chain; 5sc, inc (14)
Rnd 02: ‘3sc in one st, 4sc, 3sc in one st, sc’, repeat * 2 (22)
then fasten off and leave a long tail for sewing
Comments
Post a Comment